Tuesday 18 December 2018

Create Reading Activities from Authentic Text in Minutes with Quillionz


As teachers, we are constantly hearing about the wonders of AI and how it will take over education and make all of our lives easier.

Well here finally is a genuine example of something we can use to save time and effort. Quillionz is an AI-powered question generator that can help you to take any text from anywhere and create a range of comprehension or test questions around it.
All you need to do to get Quillionz to generate your questions is register and the find the text you want to use.

You can copy-paste your text (anything between 300 and 3000 words) into the Quillionz editor, give it a title, select a domain (the domain is the area of study) from the drop-down menu and then click on ‘Proceed’.
It will then suggest some keywords from the text that you can choose from. Selecting these keywords will help to direct the focus of the questions towards the things that you think are most important from the text.
Then click on ‘Proceed’ again and the AI-powered platform will analyse the text and highlight any areas in the text where it could be improved for better clarity. 

Finally, click on ‘Get Question Ideas’ and the site will generate a large selection of possible questions for your text.

It can create three different types of questions:
  • Short answer
  • Multiple-choice 
  • Recall
(Recall questions are ones with a sentence and a space that students have to complete.)

Once you have the question you can read through them, delete the ones you don’t want and edit any that aren’t quite right.
Then you can save it to your dashboard to use again and simply download it as a text file.
The text file comes complete with answers so you can keep that as your answer key and copy and paste the questions into a worksheet for students.


Using Quillionz you can now find interesting and current texts and turn them into activities in minutes. This is another great step away from the ones size fits all textbook and a great tool for enabling teachers to create content that is suitable and relevant to their student's lives and interests. You could even get students to register and create reading tasks for each other.

I hope you enjoy using Quillionz with your students.

Monday 3 December 2018

Linguacuisine - Combining languages, culture and cooking


Linguacuisine is the product of Newcastle University and is based around the wonderful idea of learning language through cooking.

You can access the content either through the web browser or by downloading an Android or iOS app.


The site contains a collection of recipes in multiple languages and each one is separated into ingredients and instructions along with a video of the person explaining how to cook the dish. These are shared in the community part of the site.

The content is very authentic in all ways. The videos have been submitted by users and most look like they have been made using a phone camera, so don’t expect Jamie Oliver production standards.

Users can also upload their own videos, so this is a nice task you can set your students to do and a great way for them to share their recipe products.

The app version of the site looks a bit like the food ‘homemade’ but it is functional and provides a nice platform for students to find and share authentic content based on the culture of food.
 
You can watch a tutorial on how to use the app here

I hope you and your students find some nice recipes on Linguacuisine and enjoy cooking some English food!
 
Best
 
Nik Peachey

Friday 30 November 2018

Epigrammar - Making assignment marking quick and collaborative

If you have a lot of student assignments to mark, and especially if many of them have been handed in on paper, then Epigrammar is going to be a great tool for you.

Epigrammar has been designed to take a lot of the sweat and monotonous repetition out of homework marking. Basically, what Epigrammar does is enable you to create classes for your students where you or they can upload their homework assignments and you can add comments to them. That doesn’t sound so unusual, but Epigrammar can also allow you to create a bank of comments that you can reuse so that you aren’t having to write the same thing over.
Another great feature of Epigrammar is that it isn’t restricted to text type documents, so if your student has done their homework on paper or even if their homework is a sketch or painting, you or they can take a picture of it, upload it to the platform and then you can add comments and marks.

Another nice feature of Epigrammar is that you can make some assignments ‘shared’ so that students can see what their peers have uploaded and even add their own comments and suggestions.

The other great time saver though is that at the end of the term or semester when it’s time to write up a report about your students’ work, Epigrammar can automatically generate suggestions for these based on the comments you have made on their written work. Then all you have to do is drag and drop in the ones you want to use and edit them.

To get started, you just need to register and then set up a homeroom. Once your homeroom is created you can generate an invitation code and students can then use this to register on the site. This code adds them to your class.

You can then either share documents for them to comment on, or they can upload their work to the site for you or their peers to comment on.

Comments are added by dropping coloured pins on the document and then writing in and saving to the right of the screen.

All of these comments then become visible to the student(s) on the left of the screen.

Here’s a link to a video tutorial that goes into more depth on the process of generating reports: https://epigrammar-1.wistia.com/medias/xrw1lvexa7

It’s clear that the more you use Epigrammar the more time it is likely to save you and the more efficient the whole process will become. A bonus feature of the site is that you and your students will also be creating a form of e-portfolio that will enable you and students to look back over their work and assess progress.

Epigrammar has a free subscription which should enable you to test it out with a group of students, but to be useable at scale you will need to subscribe. The price though seems very reasonable when comparing to the value of your time and the amount of it you are likely to save by using the platform for all your marking.

I hope you and your students enjoy using Epigrammar and that it doesn't just save you time, but also increases the overall impact of your marking.

You can find more tools like this and advice on how to train teacher to use them in my ebook.


Buy Now

I hope you find it useful.

Best

Nik Peachey


Thursday 30 August 2018

WordBooster - For Creating Learning Around Authentic Text

When technology first came along we were all told that it would save us time and make our lives easier, and yet here we are many years later working harder than ever.

Well at least there is WordBooster that really does live up to the hype, save time and deliver excellent results.You can convert an article into a learning activity with glossary and vocabulary building tasks in less than five minutes.

WordBooster is the ideal tool if you want to use authentic materials to build your students’ reading skills and vocabulary. It enables you to quickly generate a glossary and some vocabulary building activities based around your choice of words from the text.

How to create a vocabulary building worksheet


  • To create your activity, register (for free) and then paste either the text or the URL into field and click on ‘GO'.

  • Wait a few moments and you will be able to format and edit the text.
  • When you’re happy that the text looks good and is  ready print, click ‘GO' again and you’ll see some suggested words and expressions to include in your activities.
  • Click on the word or phrase you want to include in your activity and you’ll get some options for the definitions of the word you include.
  • Click on the correct definition then click on ‘Accept' and the word and definition will be added to your worksheet.
  • Once you have all the words you want to include, click on ‘Done’. You can then download the text as PDF.
  • Click on 'VOCAB LIST' and you will see and be able to download the glossary.
  • Finally, click on ‘QUIZ' and you’ll be able to configure the types of questions you include in your vocabulary quiz. You can easily change the types of question. Then click on ‘Create Quiz as PDF' and you will be able to download the quiz and answer key.
All the the texts you use are stored in your profile so it’s easy to go back and reuse them or create new versions for different classes or revision for the original class.

All the worksheets also include a short link and QR code that takes students to the original article online, so if you want students to do their reading from the screen while they work on the activities, that’s also easy to do.

WordBooster really is a great tool for saving teachers time and effort and creating professional looking materials. It’s especially good for anyone working in the CLIL classroom who needs to use topic specific texts and great for authentic reading materials for higher levels.

What’s not to like?

You can find more tools like this and advice on how to train teacher to use them in my ebook - Digital Tools for Teacher - Trainers' Edition.
I hope you find it useful.

Best

Nik Peachey

Wednesday 25 April 2018

Exploiting StoryboardThat for Language Practice

StoryboardThat is a great tool for getting students to think visually and create picture stories and narrative.

Students begin by clicking on 'Create Storyboard'. They can then select background scenes for each of the frames of their storyboard.

Next they select characters. There's a really wide range and variety of characters to choose from and once these are on the storyboard they can be changed using the editor.
Students can then add text elements such as speech bubbles and thought bubbles and write in their text.

Once the storyboard is complete there are some interesting options for sharing and exporting. You can export as images for PowerPoint, Download to print, embed the storyboard into a site or blog or launch it as a slideshow directly from the site.

StoryboardThat is a great freemium tool. On the free account you can create and save two storyboards each week. If you want to become a serious user though you'll need to pay for an account, but accounts for educators are very reasonably priced.

Be sure to check out the Teacher Resources section of the site. You can find lots of great examples and lesson ideas there. Many of these are based around literary classics and you can simply adapt and customise the ready-made storyboards. Here's an example from 'A Christmas Carole' by Charles Dickens.

Quick Classroom Suggestions
  • Create flashcards of a storyline and get students to make a dialogue and write the story.
  • Get students to create storyboards of stories they write.
  • Create a storyboard with dialogue to get students to practice reported speech. You could create two versions of the storyboard one with only character A's dialogue and the other with only character B's dialogue, then get students to work in pairs and tell each other what the characters said.
  • You can create a the first three frames of the story and get students to work in pairs and create the next three. They can then exchange their three frames with a new pair and do the next three frames of each other's stories.
  • You could give students a storyboard with a dialogue and then ask them to imagine or add thought bubbles to show what the people are thinking about each other while they are talking.
  • You can create a storyboard with two characters and only include the dialogue from one. Then get your students to write in the missing dialogue from the other person.
I hope you enjoy these ideas and think of others to use with your students. If you'd like to find more activities like these check out my ebook -  20 Tech Enhanced Activities for the Language Classroom.

My Books:
 Best

Nik Peachey


Thursday 22 February 2018

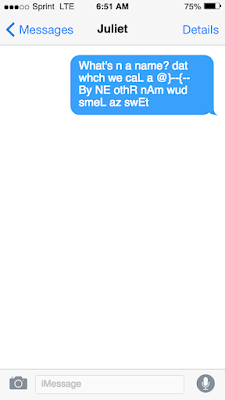
Using Fake Text Messages to Create Learning Activities

iFake Text Message is a great tool for creating authentic looking materials to engage students and shift materials design into a genre that’s both relevant and familiar. The tool enables you to create a screen image of a text conversation.

Creating a fake text is easy just go to: https://ifaketextmessage.com/

Type your message into the field on the left and you will see it appear on the screen on the right.
Then just add more text and build your conversation.

You can customise most of the features of the screen to make it look more authentic.

When you have finished just click on the ‘Create Image’ button. You can then download it and add it to your materials.


Here are a few ways you can use this with students

Gapped dialogues - Create gapped dialogues and see if your students can work out what goes in the gaps.

Conversation starters - Create the beginning of a conversation and get your students to work in pairs to continue it (They can create the next screen using https://ifaketextmessage.com/).


Dialogue rebuild - Create a longer conversation that takes 4 to 5 screens, then give your students the screen images and ask them to put them in order.

Reported speech - Use a screen image to practise reported speech. Students have to report what they read in the conversation.

Famous conversations - Get your students to think of two famous people and then create a dialogue between them.

Finding errors - Recycle some of your students’ common errors by putting them into text conversations. Then get the students to try to find and correct the errors.

Exploring cyber-bullying - Create a collection of screens that students can look at and decide whether they constitute harassment and discuss how they should respond.

Writing prompt - Create the beginning of a dialogue from a horror / romance or even sci-fi story. Get the students to continue the story.


Vocabulary record - Give the students 3 - 4 new words they have been learning and ask them to create a dialogue that includes the words.

Shakespeare as SMS - Use https://transl8it.com/ to translate a few lines from a Shakespeare play into texting language and see if your students can decode them.


I hope you enjoy these ideas and think of others to use with your students. 


Get lesson plans, teaching tips and teacher resource books with our Teachers' Classroom App.


Nik Peachey - Pedagogical Director - PeacheyPublications Ltd


Monday 12 February 2018

Create Engaging Video Tasks with Kapwing

Kapwing is a great free online video editor that makes a number of video editing activities simple.

Using the tool you can:
  • Add subtitles to videos
  • Trim the length to focus on specific sections.
  • Resize and loop
  • Add meme text to video
  • Add sound effects
  • Create stop motion video

All you need is either your own video file or the link to a clip online.
  • Go to the site, choose what you want to do and then use Kapwing’s easy interface to carry out your edit.
  • Once you have finished just click on create. 

The tool is free to use and just adds a small logo. If you want to get rid of the logo, then you can pay a minimal amount to download a version with your own brand or logo on. There are no subscriptions necessary so you just pay for the videos that you want when you want them.

Here are some great activities you can do with these tools.

Adding subtitles
  • You can students use the tool to transcribe or translate a video.
  • You can get them to add narrative to a silent video or cartoon.
  • You can ask them to add what the people are thinking or feeling instead of the script.

Trimming video
  • You can focus students on just a short part of a clip.
  • You can edit one clip into 3 - 4 sections and then get students to watch and put the sections in the correct chronological order.
  • You can create a video gap-fil and take a section out of a video clip and see if students can guess what happened in the missing part.

Add meme text
  • You can use short action clips and get students to think of memes to go on them. These could be quotes, advice, idioms or just something funny.

Having a free browser based tool Kapwing can help you to create interesting and engaging materials for students, but it can also allow students to get some hands on experience of editing video and so help to build their digital literacies.

I hope you and your students enjoy using Kapwing. You can find lots more ideas, lesson plans tools, video tutorials and teaching suggestions in my award winning ebook - Digital Video - A Manual For Language Teachers.

http://peacheypublications.com/books/digital-video-a-manual-for-language-teachers


My Books:


 Best

Nik Peachey

Tuesday 6 February 2018

Cikumas - A Free LMS Designed By Students

We spend a lot of time researching and talking about what teachers need from technology but we often forget that our students, who spend the years of their education watching various teachers struggling to get to grips with technology, have a unique insight in to what works for them and where things are going wrong. That’s why it’s great to see Cikumas, an LMS created by two students to produce the kind of classroom environment and activities they want as part of their learning process.

Alexander Degenhardt and Noah Liebherr, developed Cikumas due to the frustrations they felt in their classroom. Although they experienced multiple online solutions as learners, they didn’t feel that these catered to the needs of students, so they took the opportunity to create their own solution.


How to use Cikumas

Cikumas is a very clean and easy to use LMS that allows teachers to create media rich  interactive content, distribute it to their students either in class or for homework and then monitor their results and responses.

Unlike many other LMS such as Moodle, the learning curve for Cikumas is pretty gentle and once you log in you should be able to create some interactive content for your students pretty quickly.

When you first log in to Cikumas you go straight to the dashboard. Here you can see any active assignments that your students are working on as well as your calendar and your personal to-do list.
To start creating content and courses for your students just click on the ‘Library’ icon. This is where you will be able to store and curate all of your lesson activities and materials.
To create a lesson or activity just click on ‘Add New,' then give your activity a name, choose the topic area and add a description. You can come back and change these later if you need to.
Now you can add four types of content to your lesson. These are Text, Question, Media or File.
The text blocks have a simple to use editor that allows you to format any text content and add images and hyperlinks to external content.

Media allows you to add the usual video, image or audio files, but also mathematics equations. When adding media you can do this either from your computer, your Google Drive or from online sources such as YouTube, or in the case of images, through a Google search. You will need to allow access to your Google account to do this though.

Adding files is equally as simple and you just drag and drop any file types you want student to access and they will be uploaded.

Where Cikumas starts to get really interesting though is when you start adding question types.

There are four main types of question you can add.

Mutiple choice - These are the usual single select, multiple select, yes/no and true/false types. To create one of these questions you just click on the type you want and then add you question and answer options. You can also select how many points the students are awarded for a correct answer.
Fill in the blanks - There are two kinds of blank filling question types. You can choose to create a text with gaps the students have to type into or you can select which words are extracted from the text and then students drag the words back in to the spaces.
Classify - There are two types of classification question types. You can either get students to drag and drop text labels to images or they can order parts of a text.
Free response - There are two types of free response. You can either get students to type an answer into an open field or they can record and audio response.
These interactive question types are ideal for language learners and teachers and enable you to quickly create very professional interactive content.

Once you have created your lessons and activities, you can go to ‘My Classes’ and create your classes and invite students to them.
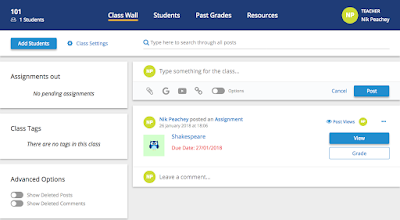
The ‘My Classes’ part of the site is where you will come to monitor your students results and grade their responses, but there is also a class wall where you can make announcements to the class  and post and share interesting materials. This can help to keep students engaged with a wider range ad-hoc learning materials and keep them up-to-date on any course changes or assignments.
Even as an experienced Moodle developer, I found that creating materials within Cikumas was much quicker and simpler. It doesn’t have the level of customisation that a platform like Moodle has, but for teachers who just want to get straight down to creating learning materials it’s a much simpler and more direct route to creating motivating learning that looks really professional and is easy to manage for both teachers and students.

I hope you enjoy using Cikumas for your students and that it helps you to save some time and deliver interactive classroom and homework assignments.

My Books:

 Best

Nik Peachey


Thursday 1 February 2018

30hands - From Flipped Learning to Digital Narrative

I’ve just been looking over the 30hands Pro app for the iPad.

30hands is a simple to use app and community for the development and sharing of instructional presentations and videos.


The app itself enables you to either upload an existing slide deck, video or images from your computer , Google Drive or Dropbox , or create your own slideshow within the app using the drawing tools within the application.
Once your slides have been created or added you can then record a narrative over each slide and also annotate the slides using the drawing features.
Once your slide sequence and recording is complete you have a number of options for sharing it. You can export it as a video, save it to either DropBox or Google Drive or add it to the 30hands community site.
The community site has a really wide collection of example presentations and you can either view these as individual slides with their recordings or watch them as video.
If you are a community member you can also download the videos and the project files and this will allow you to edit, adapt and build your own version of the presentation for your students.

Using 30hands with students

  • This is a great tool to create flipped learning video content. There’s loads of variety in what you can do, from uploading and enhancing your existing presentations with audio and annotation to creating unique slides and integrating images and video.
  • You can also use the app to create digital narrative using images from around the internet (Pixabay and Unsplash are two great places to find royalty free images) or you can use your mobile device to capture images and video and then add your own narrative voiceovers.
  • This is also a great tool for capturing student project work and for enabling student to do project reports. They can just grab images or upload their work and then add a narrative voiceover explaining their learning outcomes.
30hands works as a native app on iOS or can run in the Chrome browser on other devices so it can also be used in the BYOD classroom.

This is a great tool to enable teachers to create materials or to put in the hands of students to help develop their digital literacies and make learning tangible with genuine outputs that they can collect into a digital portfolio.
I hope you enjoy using this app with your students.

My Books:

 Best

Nik Peachey