Showing posts with label image. Show all posts

Thursday, 31 August 2017

Illustrate Poems & Create Short Image Based Narrative

Commaful is an interesting web based tool for combining text and images into beautifully visual short stories or poem.

 Once you have signed in you can start to create your narrative just by clicking on 'Create a Story' and typing in your text. You can them either search or choose from the images selected and combine the images with the text.

There are lots of artistic images, gifs and video clips to choose from and you can choose how to position the text over the images.

Once your narrative is complete it plays like a presentation that users can click through to read. You can also get a code to embed them into a web or blog page.

The app seems to be particularly popular with teens and there’s a lot of teen type fiction on the themes of romance and or horror stories. Some of the themes can be a bit strong so it’s best to use this only with more mature students.

The app is also social so users can comment on, follow and like each others creations.

I used the app to create an illustration of a poem by Robert Frost - Fire & Ice. This would be nice activity to do with students, either selecting or letting them select a poem to illustrate.

It would also be a nice way to illustrate and publish any short fiction writing that they produce.

You can also use the site to create your own reading comprehension texts or try to find something appropriate that’s already on the site.

Here are some nice examples:
I hope you find Commaful useful and create some great narrative with your students.

You can find links to many more tools like this and activities for the digital classroom in my ebooks at: http://peacheypublications.com/. All my ebooks are available for iOS and as PDF.


Sign up for my twice monthly free newsletter and get a free copy of Digital Tools for Teachers at: https://tinyletter.com/technogogy/ 

My eBooks:

Best
Nik Peachey

Tuesday, 29 August 2017

From Image to Story - Motivating Reading Tasks on Powerful Issues

Time 100 is an amaxing feature from Time Magazine. It's a collection of 100 images that have had the power to change the world. The images are displayed on a time line and you can scroll through and click on each image.


As you click through the images you can find out about the story and photographer behind it.Many of the images also have video clips about the content which range from short 2 - 3 minute clips to longer documentaries.

Many of these are very powerful images and stories, so this isn't suitable for younger learners, but if your students are more mature, these images and stories could provide really interesting reading and discussion materials about a range of issues.

You could let students choose an image each to do further research on and then get them to prepare a short presentation about it.

They could discuss which of the images they find most powerful or which they think is still most relevant today.

This is a great collection of images that have had huge influence on modern politics and society so well worth spending a few lessons with these.

You can find links to many more tools like this and activities for the digital classroom in my ebooks at: http://peacheypublications.com/. All my ebooks are available for iOS and as PDF.


Sign up for my twice monthly free newsletter and get a free copy of Digital Tools for Teachers at: https://tinyletter.com/technogogy/ 

My eBooks:

Best
Nik Peachey

Thursday, 24 August 2017

Create Virtual Reality Comprehension Tasks

Story Spheres is a great free app for creating immersive narrative experiences. It enables you to take the 360 degree panoramic images from your mobile device and covert them into an interactive virtual reality experience.

Once you have created and uploaded the image you will also need to add one or more audio files of your narrative. If you have a number of panoramic images from the same area you can link these together so that students can move from one to another and create a kind of virtual field trip.

The images can then be viewed either in the web browser or on mobile devices using Google Cardboard or any other VR viewer. You can also get an embed code so you can drop the spheres into websites. This is a really nice way to create dynamic VR narrative around an image.

If you don’t have the time to create your own, you may well be able to find something ready made that you can use with your students. Just click on ‘Explore Spheres’   and you can either browse or search the ones that have already been created.

You can easily get students exploring different places around the world and then sharing what they have learned in groups, or better still get your students to create their own Story Sphere to show other students something of their own world.

I hope you enjoy Story Spheres and are able to create some interesting narrative experiences with your students.

You can find more tools and activities like these in my ebook 20 Tech Enhanced Activities for the Language Classroom.


The book is available on iOS or as PDF for other devices.

Sign up for my twice monthly free newsletter and get a free copy of Digital Tools for Teachers at: https://tinyletter.com/technogogy/ 

My Books:
 Best

Nik Peachey

Tuesday, 8 August 2017

Creating Dynamic Learning Objects with Genial.ly

This has become one of my favourite tools for creating not just infographics but all kinds of digital content from reading mazes, infograhics and interactive images to video based tasks.


Once you have built your learning objects you can either get a link to them or embed them into webpages or blogs.

This is a great template for a course introduction.


The editing tools runs in the web browser and you can connect together multiple pages, add video elements and animate just about any element of the page and design.

The dashboard has built in image and graphics search with lots of icons buttons and illustrations to add to your designs.


There are some premium templates and features that are only available for subscribers, such as downloading the files as html5, but you can purchase the right to do this on a one off basis, so if you only want to do it once you don’t need to commit to a subscription.


The templates look really professional and there is an education section that has some great ideas and templates for building games, quizzes and other instructional content.

This is a great tool for student projects and presentations and will help their results to look really professional even though they are using a free subscription.

Genial.ly is a really great authoring tool for infographics, presentations and a whole range of animated graphics.

I hope you find it useful. You can find links to many more tools like this and activities for the digital classroom in my ebooks at: http://peacheypublications.com/. All my ebooks are available for iOS and as PDF.

Related links

Best

Nik Peachey

Friday, 5 April 2013

Exploiting Infographics for ELT

For a while now I have been increasingly interested in using infographics in the design of the learning materials and courses I create for students and teachers.

For those of you who haven’t encountered the term ‘infographic’ before, an infographic is a visual representation of, what is often, quite dense statistical information. 

This is the kind of information which can be very difficult to read as prose / text, but which, when transformed to a visual, can become accessible very quickly.

If this explanation isn’t clear then you can click on the infographic about infographics and get an example which should make some of the benefits of infographics a bit clearer.


There are a few reason I believe these infographics are so useful for language teaching (especially online) materials.
  • They convey a lot of information using a minimal amount of language. This can make them useable at quite low language levels where intelligent materials for adult learners can be hard to find.
  • They are quit vocabulary rich
  • They are visual and the visual and mathematical / statistical aspects can help to convey meaning.
  • They are much easier to read then dense text on a computer screen.
  • They lend themselves to a wide range of tasks
  • You can find infographics quickly and easily on almost any topic.
  • You can develop students visual literacy
  • You can help students to become more critical of information sources (for example the infographic I linked to above has some interesting statistics, but are they true?)
  • They are great preparation for EAP students who will have to deal with dense information in their studies.
Finding infographics is quite simple. There are quite a few sites which specialise in publishing them.
  • Visual.ly has huge collection and they are easy to search and locate.
  • Daily Infographic also has a huge collection and if you sign up on the site they will email you a new one every day.
  • Cool Infographic is also quite good.
  • Failing all of these sites, you could just go to Google and type in any topic followed by the word infographic and then when you get the results go to ‘images’. This never fails to pull in something of interest on the topic.

 Once you have found the infographic you want to use, you’ll need to design a task. Here are a few generic tasks that could work with many of the infographics and don’t require you to do any preparation.
  • Find 5 - 10 interesting facts in the infographic.
  • Try to check some of the information in the infographic to find out if it is true or false. See if you can find a secondary source to support the information.
  • Write up some of the information in the infographic as a summary text / report.
  • Give a spoken presentation to the class using the infographic as support.
  • Produce a quiz about the infographic to check the understanding of other students in the class.
  • What information surprised you most in the infographic?
  • If the infographic is a survey you could get students to compare the statistics in the infographic with an analysis of their class using the same questions. Here is an example of an infographic which I used with an adult class to do a similar thing - Have you ever?  As you can see it is very similar to ‘Find someone who’ and lends itself to practice of present perfect and past tenses.
Use of infographics isn’t confined to receptive understanding though, there are also a number of free tools which can help you to produce your own.


My favourite of these is https://www.draw.io/ which has a great collection of icons and images as well as the usual shapes and symbols. You can search through these easily and just drag and drop them onto you page, then either save it as an image or store it on Google Drive.


If https://www.draw.io/ doesn’t work for you or you want something simpler, I have stored links to a collection of various infographic tools here on Meaki - Infographic tools 

Again there are lots of tasks you can use to get students creating their own infographics. Here are a few.
  • Get them to create an infographic based on a text they have read. This could include relationship map of the characters, timeline of events, actions that took place in particular places etc.
  • Get students to convert a text which has statistical data into an infographic. This could be based on a classroom survey or could be something from a business magazine etc.
  • Get students to create mind maps of words based around topic areas and add visuals to them.
  • They could create an infographic of information based around a verb tense. This could include timelines and illustrated example sentences as well as breakdown of form and pronunciation features.
These are just a few of the ways I think we could and should be exploiting infographics with students. I hope you find them useful. Over the past year + I have been using Pinterest to collect together the infographics that I feel have potential for exploitation in teacher training or language training materials. You can access these below.
I hope you find these useful.

Buy Now
Related links
Best
Nik Peachey

Sunday, 29 May 2011

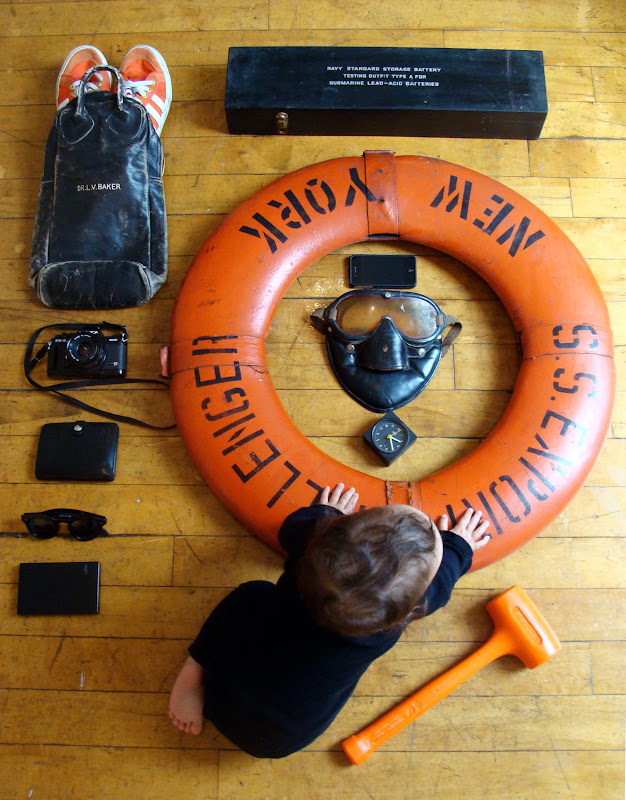
Things to do with a Burning House

The simple basis behind The Burning House Website is this:

"If your house was burning, what would you take with you?"

It's a really simple website which asks a simple question. The rest of the website has images with accompanying lists sent in by visitors to the site. Each person's list and image has about 10 items.

I really like websites like this because the strong idea and images provide great authentic materials to get students thinking and speaking. Here are a few of the images.


How to use this with students
  • Get the students to look at the images and identify what they see.
  • Save some of the lists and images and get them to match them up for simple vocabulary practice.
  • Ask the students what they think all the images have in common.
  • Show students the images and ask them to try to guess what the person who owns the objects is like (great for modals of deduction).
  • Get students in your class to bring in their on image (you could mix them up and see if they can guess which one belongs to each person.
  • Get them to upload their image and list to the site or create a wall design in your classroom.
  • Get students to tell the story behind each of their ten possessions on their list.
  • Give each students one of the images from the website and ask them to imagine they own the objects and get them to invent the story of why each object is on the list.
  • Get the students to browse the site and find the person with the list which is most similar to their own.
I hope you enjoy The Burning House and the stories behind the images.

Related links:

Nik Peachey

Sunday, 30 May 2010

Image Based Speaking Activity for IWB

This is a quick image based speaking activity that any teacher with an IWB or just a data projector in their classroom can do.

It's based around a photographic portfolio site by photographer Scott Stulberg. Scott's site opens directly to a slide show of some of his fantastic images.
The slides change at the rate of about 1 every 4 seconds and the sequence seems to be pretty much the same each time you go to the site. Here you can see Scott's images

So what's the activity?
  • It's very simple tell your students to watch the image slide show. After about 10 - 15 images, close the site and put your students in pairs and try to get them to brainstorm as many of the images as they can remember. This should get them talking and describing the images to each other.
  • Once they have had some time to talk and remind each other, get some feedback from the class and try to get them to describe as many of the images as they can remember to you. Help them with any vocabulary they may be struggling with.
  • Next, ask them if they can remember the order of the images. Which one was first etc? Put them in pairs once again to discuss again and try to remember the order.
  • Next, play the slide show again and get the students to check the order. When the slide show is finished. Get the students to once again tell you the order of the slides.
  • In the next lesson, ask the students again to try to recall and describe in pairs as many of the images as they can remember from the previous lesson. You could use some vocabulary words, especially the new words that came out of the lesson as prompts.
If you want to follow this up by getting some more static images to get students to describe in more detail, then be sure to check the index, as there are lots more images there.

I've always found images to be a very powerful tool for helping students to remember vocabulary and descriptive words. I hope you find this activity useful.

Find more: image based activities for EFL / ESL students

Related links:
Best

Nik Peachey

Thursday, 8 October 2009

Crazy Comparatives & Superlatives

I have to say that I used to dread teaching comparatives and superlatives and always found it really hard to think of something original to get my students interested, so when I saw this site I was really delighted. It's not only quite funny, but has some excellent materials for covering what can be a really dull language point.


The site is called the Universal Record Database and it is a collection of user generated and very unofficial world records. Anyone can go on the site and create their own world record. As proof they simply add an image or a video of themselves creating the record.

Here's a few examples:

Most People Simultaneously Drinking Out Of A Pineapple


The widest tongue


Most Handshakes Elicted From A Dog In 30 Seconds


Most Women Named Wendy To Eat At A Wendy's


There are lots of ways to use the Universal Record Database with students.
  • Show them some images and videos and see if they can guess what the record was.
  • Tell them the type of record and see if the can guess the number or amount (e.g. how wide is the widest tongue)
  • Get students to think of their own crazy records and create a picture or video to upload to the site.
  • Create your own class records and try to get each students to have a record.
  • Get students to try to break one of the records from the site.
  • Get students to find their favourite record on the site or the one they think is funniest and share it with the class, or blog about it.
The Universal Record Database certainly wasn't made for educational purposes, so be careful to check for appropriacy according to your students, but I think it's a wonderful example of the kind of bizare things you can use from the web. I know my daughter was always fascinated by the Guinness Book of World Records, so I'm pretty sure students will enjoy this and it will liven up those dull comparatives and superlatives class.

Anyway, here's my favourite record, Tallest Tower Of Humans Wearing One Sock Each, Brushing Teeth And Listening To 'Thriller'.


I hope you find this useful and have a lot of fun with your students.

Here you can find more than 100 online activities for EFL and ESL students

Related links:

Best

Nik Peachey

Thursday, 16 July 2009

Get the News Through Images

Images are a great way to create curiosity and get students interested in finding out more about a topic, that's why The Photo Stream could be such a handy tool for getting students interested in reading short news stories.


The site shows the images connected to news stories from all over the Internet. When you put the cursor over an image a brief summary / teaser text appears.

If you click on the image you can go to the story at its original source. The story will appear with a Photo Stream frame at the top and here you can click on 'Comments' and leave a comment about the story.


You just need to have an email address (which doesn't appear) to post your comment.


There are many ways you can use this with students:
  • In class you can show students the most recent images (using a data projector) and summaries and see which ones they would most like to read. They could discuss and vote on the one they most want to read and argue about why. Then click and print the story for them.
  • Before showing the site you could get them to predict what images they will see based upon what they know is happening in the news. Give points for correct guesses.
  • Show the images and ask the Sts to guess what the story is about and what information will be contained. Then print some or get students to read and check the stories to see if they were correct.
  • Get students to read an article then post a summary as a comment.
The main thing to be careful of with this site is the images may well be inappropriate for younger learners, so think carefully before letting your students loose on the site.

You can find 30 + more reading activities for EFL ESL students here.

Related links:
Best

Nik Peachey

Tuesday, 14 July 2009

What are you Wanted for?

I just came across this collection of fun photo adapting tools and thought this one that enables you to create a 'Wanted' poster from your own image could be a useful one to use with students or on teacher training courses.

It's really easy to use, you just upload an image and then write in your own caption. You can then download and print the images or add them to blogs or web pages.

There are a number of ways you could use this with your students:

  • As a writing prompt - Get them to create their own 'Wanted' poster with their own captions and then exchange the posters and get someone else in the class to write the story of how they became 'Wanted'.
  • As a speaking prompt - Get students to create and print their wanted poster and then create their own fictional story of how they became 'Wanted'. See which students can create the best story.
  • For self-evaluation and reflection - Get students to think about their weaknesses and select one weakness they would like to work on improving . They should add this as the caption, then get them to think of how improving that weakness will help them and add this as the reward (they will need to be concise). They can then print their 'Wanted' posters and hang them up in class around the walls as reminders of what they need to focus on. The students could then look at each other's posters and offer each other tips and advice on how they can improve. This can work well with teacher training sessions too.

I hope you make some useful wanted posters and be sure to check out some of the other ways in which you can adapt your images here. Do leave a comment if you came up with some good ideas for how to use them and let me know which ones are your favourites.

Related links:
Best

Nik Peachey

Monday, 22 June 2009

Multiple Media Search

I have to say that I think Spezify has just become my favourite new search engine. I think this is a really great search engine to use in class with students or to get them to use. It's really simple. It displays all results as images and it searches a wide range of multiple media sources such as video, image Twitter etc, not only text.
To make a search you just type in your key word and all the results start to appear as images.

If you click on the small spanner icon at the top right you can adjust the setting.

There is a safe search option here which is on by default, so that's handy. You can also turn various other options on or off so that you restrict which sources are included in your results.

As I said I think this is a nice search engine to use in class on IWB / data projector or for students.
  • You could type in keywords to brainstorm around topics or themes for the class you are doing.
  • You could type in a keyword and get students to choose one result that they think will be interesting and get them to explore it as a warmer.
  • You could get students to find an image, a text, a video and a tweet and write / talk about the connection between them.
  • Or you could just use it to reinforce and find examples of vocabulary.
Hope you like Spezify and find some good uses for it in your class.

Related links:
Best

Nik Peachey

Tuesday, 16 June 2009

Create Your Lego Avatar

Having an avatar (some kind of representation of yourself) can be pretty handy both for you and your students. It's a good way to protect your students' identity if they are becoming part of an online community and helps reduce the amount of unwanted attention that some very attractive students might get from having their real image on a site.


Mini-Mizer 3.0 is a really nice way to get your students creating avatars. It's really easy to use and they can quickly click through the various options for customising the basic blank figure.

They can add various extras and backgrounds as well as changing all the features of the face. They could try to make the avatar look like themselves or totally different. When they are finished they will just need to take a screen grab of the image and then they can use is it when ever they create online profiles on any social type sites.


You can also use Mini-Mizer 3.0 in classes to develop language of description.
  • You could write some brief descriptions of people and get students to try create an avatar of them.
  • You could describe a famous person, get the students to create an avatar and then guess who the famous person is. The students could decide which avatar looks most like the celebrity.
  • Students could work in pairs, one with an image that they describe but don't show while the other listens / asks questions and tries to recreate an avatar version of the image.
  • Students could create avatars of someone in the class and the others could try to guess who it is.
Mini-Mizer 3.0 is a simple free fun tool, that particularly younger students are likely to enjoy using and which can be used to help protect your students' identity. I hope you enjoy it.

Related links:

Best

Nik Peachey

Tuesday, 21 April 2009

Flickr and Wiktionary Based Image Dictionary

Shahi is a visual dictionary that combines Wiktionary content with Flickr images, and more! This is a really handy tool for students or in the classroom if you have a computer + projector set up.

All you do is type in your vocabulary word and you get images ( from Flickr, Google or Yahoo) and a definitions with part of speech and some example sentences from Wikitionary.

If you want to give your students a better view of the images that the Shahi finds in relation to the word, then just click on the image and it enlarges.


Of course the most common problem with picture dictionaries is that the concepts of many words, especially at higher levels aren't 'visual' as such and are much more abstract concepts. I did a search on 'noise' and here's what I got.


You can use this to your advantage though by getting students to think about the connections and associations between the words you search for and the images. You can turn this into a game and give points to the students with the best explanation for the connection between word and image. The explanation could be literal or more imaginative and narrative based.

One other thing that I like about Shahi, is that the results from each word you type in are 'piled up onto top of each other, so if you use it as a reference throughout a lesson or activity, you still have a record there of all the words that came up.

You could also use this feature in reverse, by creating an image word list before the activity so that students can prepare their vocabulary and refer to it during the activity.

Shahi is a nice versatile free tool and one that your students could easily use on their own. Hope you enjoy it.

Related links:
Best

Nik Peachey

Monday, 2 March 2009

Image and Video Search

Tag Bulb is a great tool to make images and videos accessible within the classroom. It's also incredibly simple to use. Just type in your keyword and click. It searches through a range of video and image sharing sites and displays the results as thumbnails. You can just toggle between videos or images.

Tag Bulb is a great fast way to access visuals from your classroom and really handy if you have a data projector or IWB. It can become an instant picture dictionary or great tool for helping you stimulate discussion or brainstorm vocabulary around a topic.

Of course be careful about what you or your students search for as you/ they could come across some more adult orientated images, but on the whole this is a really useful tool.

Hope you enjoy using it.
Related links:
Best

Nik Peachey

Thursday, 12 February 2009

Darwin and Evolution

I've just been having a little play with a great feature on one of the Open University's websites Devolve Me.

The site is dedicated to Darwin and as well as having some useful information and resources about him, has a wonderful little tool to take yourself backwards through the evolutionary process.

Just upload your image adjust it for position and then watch yourself transform back for a few million years.

So if you would like to see how I got from this:
Through this

To this
Then just click on this link here and watch as I go back through time: Nik Devolved
Be sure to play with the little slider to take me backwards and forwards.

As for classroom exploitation:
  • You could transform a few people using images of famous people then see if students can guess who they are.
  • You could also get your students to transform images of themselves and guess who they are.
  • Or you could be serious and use this to start a discussion on evolution. Students can post and compare their opinions to the 'Have your say' forum

Anyway, hope you enjoy it.

Related links:
Best

Nik Peachey

Wednesday, 31 December 2008

Creative Commons Images

Fotonauts must be one of the most attractive photo sharing websites I've seen for a long time and it is especially good because of the focus on using creative commons licensed images.

There are some beautiful images from all over the world and each album has information about the topic and links to Google maps so you can see where the image comes from.

The site is beautifully designed with a really nice interface and slide show feature. You can also create widgets of the slide shows to embed into web pages (I couldn't actually get this to work on mine though).
If there's a problem with the site then it's the lack of a search tool, which seems a strange omission on a site aimed at organising and sharing images! Fotonauts is still in beta though, so perhaps this will soon be resolved.

This is a site that must be worth keeping an eye on if you use images regularly in your teaching.

Hope you enjoy it.

Related links:
Best

Nik Peachey

Tuesday, 2 December 2008

Are You a Celebrity Lookalike?

This is a nice site that you can use to have some fun with your students and of course to generate some language and learning activities. It's called Celebrity Matchup. All you do is choose the gender and then upload a picture of yourself or one of your students. The site then scans their image and selects a set of celebrities that they look like. Here are some of my matches!
Can't really say I'm flattered! I also tried matching myself to female celebrities (just curiosity) and got these results. Could I really be the Carmen Electra of ELT? Um! Doubt it!


Well I'm not really sure that Celebrity Matchup works, but I think you could have a lot of fun and discussion with your students deciding which is the closest match and what the differences and similarities of the facial features are. I'm sure there's a really good facial characteristics lesson in there somewhere with lots of vocabulary.

Anyway, if you or your students really like the matches you get you can even get a widget to add your results to your blog or website.
Just by clicking on the image you see above once you've matched up and pasting the code into your blog.

Well I hope you enjoy that and match up to some flattering celebrities, but do watch out for the advertising.

Related links:
Best

Nik Peachey